

Replacement Internal Oxygen sensors
Availability:
In Stock
- $199.00 AUD
- $199.00 AUD
- Unit price
- per
Free Shipping on all products
Free standard shipping - deliveries arrive usually within 30 days
Proper environmental control are crucial for the effective operation of oxygen sensors. Here is a summary of key practices for optimal performance and longevity of these sensors:
-
Replacement Schedule: Oxygen sensors should be replaced every 12-18 months. This ensures that they continue to provide accurate readings, as sensor performance can degrade over time.
-
Temperature: Store and operate sensors in environments maintained between 10-30 degrees Celsius. This temperature range helps prevent degradation in sensor accuracy and avoids operational issues related to extreme conditions.
-
Sunlight Protection: Keep sensors away from direct sunlight, as UV exposure can negatively affect sensor materials and electronics, reducing reliability.
-
Regular Maintenance: Perform periodic maintenance checks to ensure sensors are functioning correctly. This should include inspecting for physical damage and verifying sensor calibration and performance.
By following these guidelines, you can help ensure the consistency, accuracy, and reliability of oxygen level measurements, which are critical for many applications.
Replacing the internal sensors in an oxygen sensor unit involves careful handling to avoid damaging the components. Here's a structured approach based on the procedure you outlined:
-
Power Off: Ensure the sensor unit is powered off and disconnected from any power sources before you begin.
-
Accessing the Internal Sensors:
- Locate the three screws on the back of the oxygen sensor housing. Use the appropriate screwdriver to carefully remove these screws.
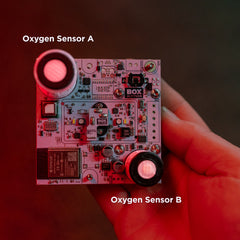
- Gently open the housing to expose the internal components, including the PCB (Printed Circuit Board).
-
Removing the Old Sensors:
- Carefully detach the PCB if necessary, noting the connections and arrangements.
- The old sensors might be lightly glued in place. Gently loosen them, ensuring you do not apply excessive force that might damage other components.
-
Installing New Sensors:
- Position the new sensors into their designated slots in the sensor housing. Make sure they are oriented correctly.
- Reattach the PCB, ensuring all connections are secure and aligned properly.
-
Reassembly:
- Place the sensor housing back together and secure it with the screws, ensuring everything fits snugly.
-
Testing:
- Once reassembled, power the unit back on and perform a functionality test to ensure the new sensors are working correctly.
These steps should help maintain the sensor’s integrity and ensure proper functioning. If you're unsure at any step, consulting the manufacturer's instructions or seeking professional assistance is advisable.


- Choosing a selection results in a full page refresh.